Quick Start
This is the shortest supported setup for painting a mesh at runtime. At the end, you will have a paintable mesh, a player-side painting controller, an on-mesh brush preview, and the default runtime color picker.
Before you begin
You need a mesh with usable paint UVs, a material that uses the Mesh Painting material function, and a locally controlled pawn, character, or controller that owns PaintingModeControllerComponent.
Quick Start Tutorial
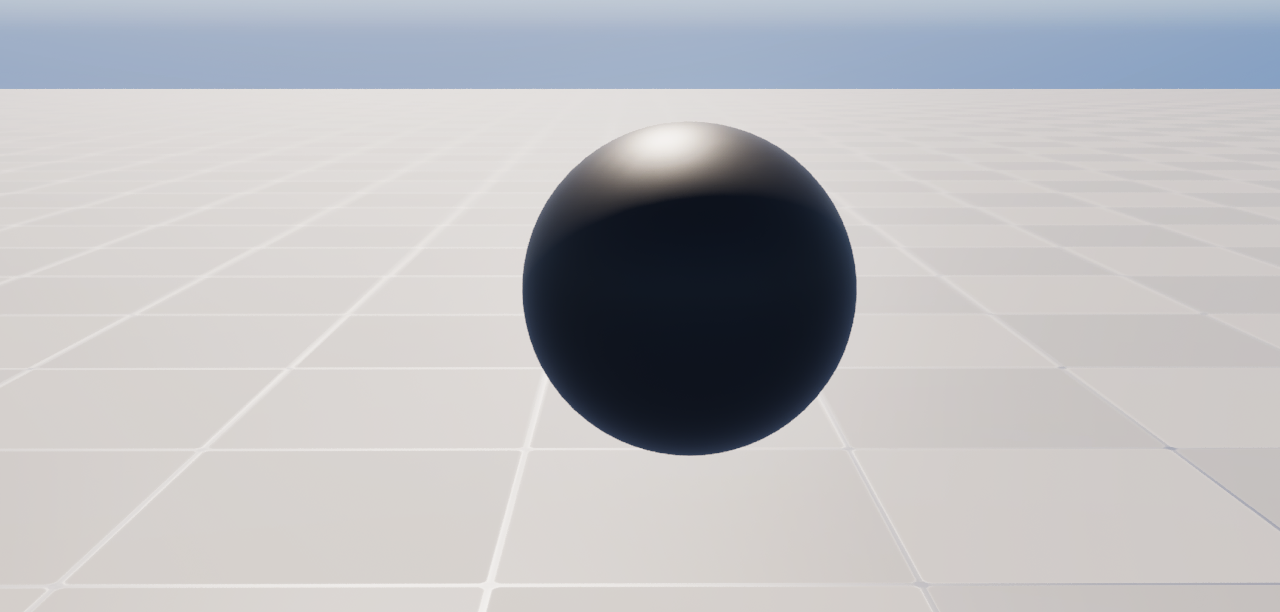
1. Place a Mesh in the Level
Start by placing the mesh you want to paint in your scene.
2. Add the Paint Target Component
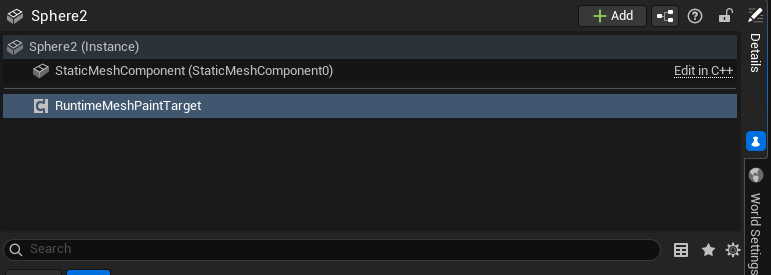
Select the actor that owns the mesh, then add RuntimeMeshPaintTargetComponent from the Details panel.
This component owns the runtime render targets, prepares the paint textures, and applies them to the target mesh materials when the game starts.
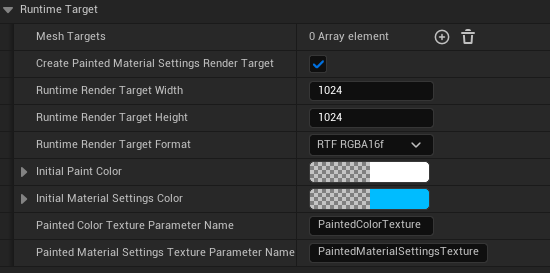
3. Review the Runtime Target Settings
The default runtime target settings are enough for a first test. Later, you can adjust render target resolution, format, initial colors, and texture parameter names from the Runtime Target section.
4. Choose Mesh Targets When Needed
If the actor has a single mesh component, the target component can resolve it automatically.
If the actor contains multiple mesh components, add the component name of every mesh that should be paintable to Mesh Targets.
An empty Mesh Targets list only auto-resolves an actor with a single mesh component. It does not make every mesh on a multi-mesh actor paintable.

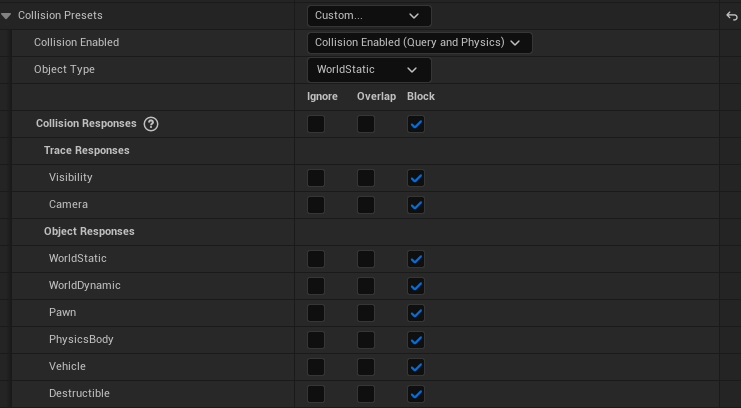
5. Check Collision
The mesh must block the trace channel used by the painting controller. By default, this is Visibility.
If the trace does not hit the mesh, the brush preview cannot lock onto the surface and painting will not be applied.
6. Set Up the Mesh Material
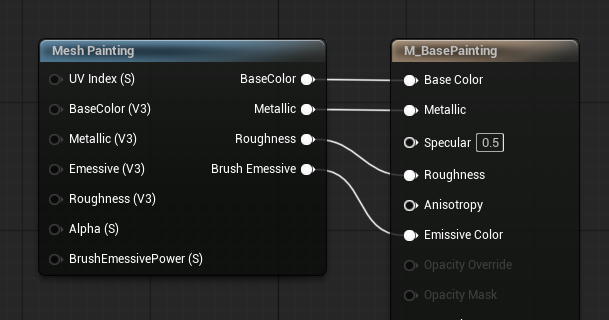
Open the mesh material and add the Mesh Painting material function. Connect its outputs to the matching material outputs:
BaseColortoBase ColorMetallictoMetallicRoughnesstoRoughnessBrush EmissivetoEmissive Color
Brush Emissive is required for the on-mesh brush area preview. Painting can still work without it, but the GPU brush ring will not be visible on the mesh.
If the material already has base color, metallic, roughness, or emissive inputs, connect those original values to the matching inputs on the Mesh Painting function first. The function then combines the original material with the runtime paint layer.
The function UV Index must match RuntimeMeshPaintTargetComponent > UVChannel.
For more information about the material setup, see Material Setup.
7. Add the Painting Controller
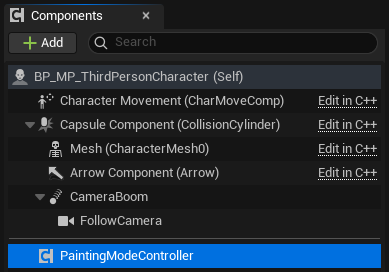
Go to the player pawn, character, or controller class that will handle painting input, then add PaintingModeControllerComponent.
This component handles paint mode input, brush settings, brush preview, color picking, camera behavior, and multiplayer paint command submission.
8. Optional: Limit the Controller to Specific Targets
You can leave PaintTargetComponents empty on the controller. In that case, the controller can paint any valid RuntimeMeshPaintTargetComponent it hits.
If you fill PaintTargetComponents, painting is limited to only the target components in that list.
9. Choose a Control Mode
Control Mode decides which camera and movement behavior the component takes over while Painting Mode is open. It does not change painting itself.

Every mode except None provides the core paint controls: toggle Painting Mode, paint, direct color sampling, and brush-size adjustment. The differences are below.
| Mode | Built-in behavior while painting | Required setup |
|---|---|---|
Third Person Controller | W/A/S/D painting movement, Middle Mouse orbit, Shift + Middle Mouse pan, Mouse Wheel zoom. Normal look is locked while painting. | ACharacter, CharacterMovementComponent, SpringArmComponent |
First Person Controller | Middle Mouse rotates the first-person view. Your normal movement stays active; no pan, zoom, or plugin movement. | CameraComponent |
Drone Controller | Middle Mouse rotates the owner actor and Shift + Middle Mouse pans. Flight and movement stay in your Pawn or Blueprint. Map CameraZoomAction yourself if this mode also needs zoom. | CameraComponent |
Simple | Paint controls only. The plugin does not change camera, look, movement, orbit, pan, or zoom. | None |
None | No plugin input or Painting Mode entry. Drive the entire flow from your own Blueprint or C++. | None |
For First Person Controller and Drone Controller, CameraName is optional. Leave it empty to use the active camera, or set it when the owner has multiple cameras. Third Person Controller always uses a Spring Arm and does not use CameraName.
If a required component is missing, entering paint mode stops and the plugin reports a clear warning in the screen message and log.
For a quick test with Unreal's First Person template, choose First Person Controller. For a standard third-person template, choose Third Person Controller.
10. Enter Paint Mode
Start paint mode with the default toggle input or by calling EnterPaintingMode.
When setup is correct, the color picker opens, the brush preview follows the mesh surface, and painting applies color to the runtime paint texture.
Default Input Assets
If bLoadDefaultInputAssets is enabled, the component loads the plugin's ready-to-use input assets:
/MeshPaintingCore/Input/IMC_PaintingMode/MeshPaintingCore/Input/IMC_PaintingModeToggle
Default quick controls:
Ptoggles paint mode. IfbAutoCreateColorPickerWidgetis enabled, the color picker menu opens when paint mode starts.Left Mousepaints under the cursor.Ctrl + Zundoes the most recent completed paint action.Ctrl + Yredoes the most recently undone paint action.Spaceimmediately samples the color under the cursor with the active 3D color sampling mode.Middle Mouse + Dragorbits the active camera inThird Person Controller, rotates the first-person view inFirst Person Controller, and rotates the owner actor inDrone Controller.Shift + Middle Mouse + Dragpans the camera inThird Person ControllerandDrone Controller.Ctrl + Mouse Wheeladjusts brush size.Mouse Wheelzooms the camera inThird Person Controller.Drone Controllerdoes not add a default wheel zoom binding; mapCameraZoomActionin your own input context when needed.W/A/S/Dmoves the character inThird Person Controller.
That is all you need for a basic runtime paint test. If your project needs multiplayer, save/load, texture export, custom materials, or advanced brush behavior, continue with the other documentation pages.
Packaged Static Mesh Warning
If a static mesh paints in the Editor but not in a packaged build, enable Allow CPU Access in its Static Mesh Build Settings. See Troubleshooting.