Material Setup
Runtime Mesh Painting stores the painted result in UV space. Your mesh material uses the Mesh Painting material function to combine that runtime paint layer with the material's original look.
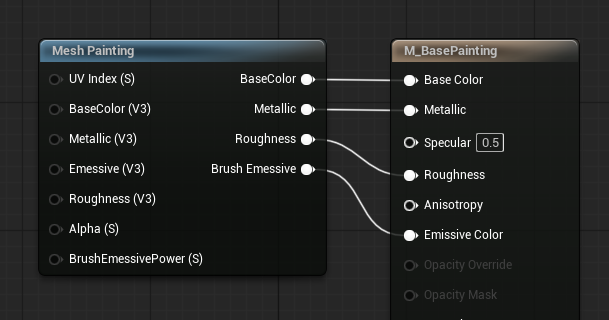
For a basic setup, add the Mesh Painting function to your material and connect its outputs to the material output:
BaseColortoBase ColorMetallictoMetallicRoughnesstoRoughnessBrush EmissivetoEmissive Color
Default Setup
You do not have to plug anything into the function inputs for a first paint test. If the inputs are left empty, the function uses its default values and the mesh can still receive runtime paint.
This is the fastest way to confirm that the paint target and painting controller are working correctly.
For the brush area preview to appear on the mesh, connect Brush Emissive to Emissive Color. The paint result can still work without this connection, but the GPU preview ring will not be visible.
Using Your Own Material Values
If your mesh already has textures or custom material values, connect them to the function inputs:
BaseColorfor the original base color or base color texture.Metallicfor the original metallic value or texture.Roughnessfor the original roughness value or texture.Emissivefor your material's own emissive color, if it already has one.
When you paint, the runtime paint layer is drawn over these values. In the painted area, the paint becomes visible instead of the original texture.
Brush Preview Emissive
Brush Emissive is the output used by the GPU brush area preview. It shows the ring that marks where the brush will paint.
Use BrushEmissivePower when you want to control the brightness of the preview inside the material. The controller also has Brush Area Preview Emissive Intensity, so the usual setup is:
- Keep
BrushEmissivePowerat its default unless the material needs a different preview strength. - Adjust
Brush Area Preview Emissive IntensityonPaintingModeControllerComponentfor gameplay/UI tuning. - Keep
Brush Area Preview Colorwhite if the preview should follow the current paint color.
This emissive preview is visual feedback only. It is not the stored paint color.
Material Settings Painting
The plugin can paint base color and, when enabled on the target component, material settings.
Create Painted Material Settings Render Target on RuntimeMeshPaintTargetComponent creates the additional render target used for painted metallic and roughness data. Keep it enabled if you want the Metallic and Roughness outputs from the material function to change when painting.
Initial Material Settings Color uses the red and green channels as the starting material settings:
R= initial metallicG= initial roughness
The plugin manages the remaining mask channels internally.
Alpha
Alpha controls how strongly the runtime paint covers the original material.
By default, Alpha is 1, so painted areas fully show the paint result. If you lower or customize this value, the original material can remain visible together with the painted color.
UV Index
UV Index is important. It tells the material function which UV channel should be used for the runtime paint lookup.
This value must match the UVChannel value on RuntimeMeshPaintTargetComponent.
If the material uses a different UV index than the paint target component, the paint can appear in the wrong place, stretch incorrectly, or show up on unrelated parts of the mesh.
Quick Check
Before testing in a full character or production material, verify the setup on a simple mesh:
- Add
RuntimeMeshPaintTargetComponentto the mesh actor. - Add the
Mesh Paintingmaterial function to the mesh material. - Connect
Brush EmissivetoEmissive Colorif you want the brush area preview. - Make sure
UV Indexmatches the target component'sUVChannel. - Enter paint mode and confirm that the brush paints the expected surface.